
About the Add-in
Short introduction text explaining what Visibility Manager does, who it is for, and what problems it solves.
📺 Watch Video Tutorial on YouTube ← See the tool in action!
👉 Jump to the Complete Step-by-Step Guide
Complete Step-by-Step Guide
| **Version 1.0.0 | Last Updated: November 2025** |
📑 Table of Contents
- Getting Started
- Installation
- Launching the Tool
- Interface Overview
- Working with VG Overrides
- Working with VG Overrides
- Advanced Features
- Real-World Workflows
- Troubleshooting
Getting Started
Installation
Requirements:
- Revit 2023, 2024, 2025, or 2026
- Windows 10 or later
- Active subscription (30-day trial available)
Installation Steps:
Download from Autodesk App Store:
- Open Autodesk App Store in your browser
- Search for “Visibility Manager”
- Click “Start Trial” or “Subscribe”
Automatic Installation:
- App Store downloads and installs automatically
- Restart Revit after installation
Verify Installation:
- Open Revit
- Look for IB-BIM tab in the ribbon
- You should see the Visibility Manager button
Installation Location:
- Tool installs to:
C:\ProgramData\Autodesk\ApplicationPlugins\ - Log files saved to:
C:\ProgramData\IB-BIM\VisibilityManager\Logs\
Launching the Tool
Two Ways to Launch:
Method 1: From Ribbon
- Click the IB-BIM tab
- Click Visibility Manager button
Method 2: From Add-Ins Tab
- Go to Add-Ins tab
- Look for External Tools
- Click Visibility Manager
Note: You must have a view open.
The tool works on the current active view.
Interface Overview
When you launch Visibility Manager, you’ll see a window divided into three main sections:
┌──────────────────────────────────────────────────────┐
│     Copy/Remove Filters & VG Overrides               │
│     Choose items from current view and apply to      │
│     selected targets                                 │
├─────────────┬─────────────┬──────────────────────────┤
│ ❶ Source   │ ❷ Target   │ ❸ Target Templates     │
│   (Current) │   Views     │                          │
└─────────────┴─────────────┴──────────────────────────┘
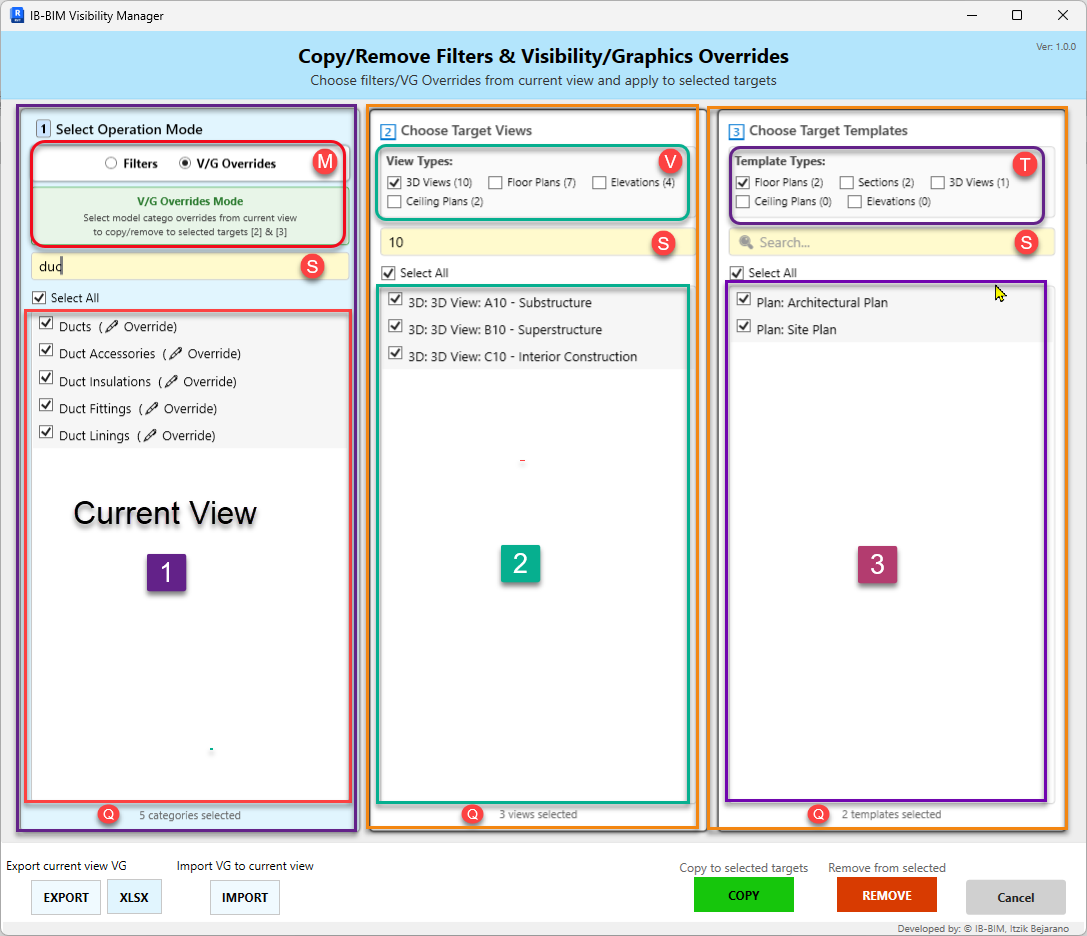
Figure 1: Filters mode interface – showing the active Filters panel (green).
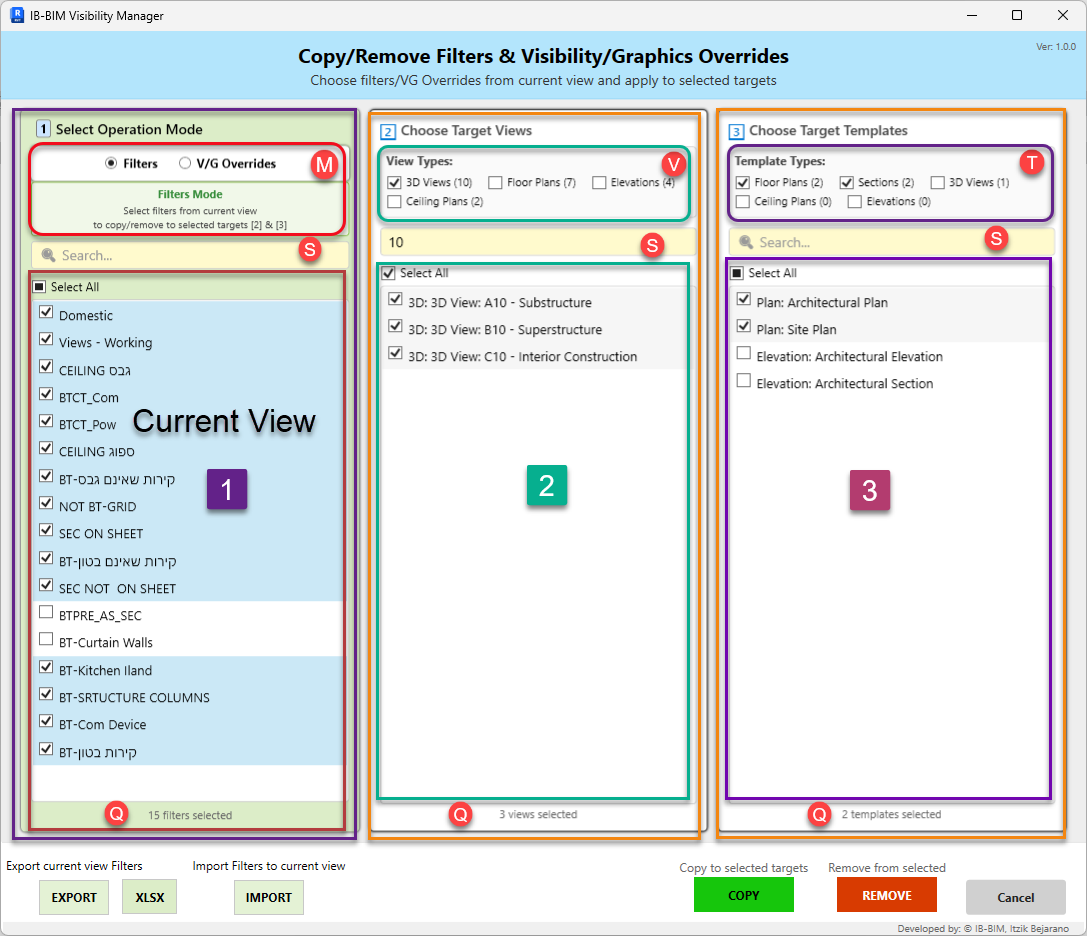
Figure 2: V/G Overrides mode – showing the active Overrides panel (blue).
This panel shows items from your current active view:
- Radio Buttons at Top:
- ⦿ Filters - Work with visibility filters
- ○ V/G Overrides - Work with category graphic overrides
- Mode Description:
- Explains what the current mode does
- References panels [2] and [3] as targets
- Search Box:
- Filter the list below by name
- Real-time filtering as you type
- Select All Checkbox:
- Check/uncheck all visible items
- Item List:
- Shows all filters or VG overrides in current view
- Check boxes to select items
- Counter at Bottom:
- “X filters selected” or “X categories selected”
Color Coding:
- Green background = Filters mode
- Light blue background = V/G Overrides mode
Panel ❷: Choose Target Views (Center)
Select which views to apply changes to:
- View Type Filters (Top):
- ☑ 3D Views (10) - Number shows total in project
- ☐ Floor Plans (7)
- ☐ Elevations (4)
- ☐ Ceiling Plans (2)
- Check a type to show only those views
- Total Counter:
- Shows filtered count: “10” (how many views match filters)
- Select All:
- Selects all visible views in the list
- Search Box:
- Filter views by name
- View List:
- All views in the project (filtered by type selections)
- Format: “ViewType: View Name”
- Example: “3D: 3D View: A10 - Substructure”
- Counter at Bottom:
- “X views selected”
Panel ❸: Choose Target Templates (Right)
Select which view templates to apply changes to:
- Template Type Filters (Top):
- ☑ Floor Plans (2)
- ☐ Sections (2)
- ☐ 3D Views (1)
- ☐ Ceiling Plans (0)
- ☐ Elevations (0)
- Search Box:
- Filter templates by name
- Select All:
- Selects all visible templates
- Template List:
- All view templates in project
- Format: “Plan: Template Name”
- Example: “Plan: Architectural Plan”
- Counter at Bottom:
- “X templates selected”
Action Buttons (Bottom of Window)
Left Side - Export/Import:
Export current view Filters        [EXPORT] [XLSX]
Import Filters to current view     [IMPORT]
- EXPORT - Creates .XLSX file (and .PAT if needed)
- XLSX - Creates .CSV file instead
- IMPORT - Import from previously exported file
Right Side - Copy/Remove:
Copy to selected targets    [COPY] (green button)
Remove from selected       [REMOVE] (orange/red button)
                          [Cancel]
- COPY - Copy selected items from Panel ❶ to Panels ❷+❸
- REMOVE - Remove selected items from Panels ❷+❸
- Cancel - Close window without changes
Basic Concepts
Current View = Reference
Key Understanding:
- The view you have open when launching the tool is your reference view
- Panel ❶ always shows items from this view
- For COPY/REMOVE: Current view is NOT modified (it’s the source)
- For IMPORT: Current view IS modified (it’s the target)
Targets = Where Changes Apply
Panels ❷ and ❸ are your targets:
- Select views and/or templates where you want changes applied
- You can select from both panels simultaneously
- The tool will process all selections
Filters vs. VG Overrides
Filters (Rule-Based Visibility):
- Control which elements are visible based on rules
- Example: “Show only walls where Type Name contains ‘Exterior’”
- Can have complex logic (AND/OR conditions)
- Applied per-view or via template
VG Overrides (Category Graphics):
- Control how entire categories display
- Example: “All Walls display in red with weight 3”
- No conditional logic - affects ALL elements in category
- Line colors, patterns, weights, fill patterns, transparency
Both are managed the same way in this tool!
View Templates
What are Templates:
- Reusable view settings (including filters and VG overrides)
- One template can be applied to multiple views
- Changing a template affects all views using it
How the Tool Handles Templates:
- Automatically detects when target views use templates
- Shows warning with view count
- Applies changes to the template (affecting all views)
- This is Revit’s behavior, not a tool limitation
Working with Filters
Copying Filters Between Views
Use Case: You’ve set up perfect filters in one view and want to apply them to 20 other views.
Step-by-Step:
- Open the Source View:
- In Revit, open the view that has the filters you want to copy
- This becomes your reference view
- Launch Visibility Manager:
- Click IB-BIM tab → Visibility Manager button
- Select Filters Mode:
- Panel ❶: Click Filters radio button
- Panel turns green
- You see all filters from current view
- Select Filters to Copy:
- Panel ❶: Check the filters you want to copy
- Use Search to find specific filters quickly
- Or click Select All to copy all filters
- Counter shows: “X filters selected”
- Select Target Views:
- Panel ❷: Check View Types to filter (optional)
- Use Search to find specific views
- Check the views where you want these filters
- Counter shows: “X views selected”
- Select Target Templates (Optional):
- Panel ❸: Check templates if needed
- You can select both views AND templates
- Counter shows: “X templates selected”
- Execute Copy:
- Click [COPY] button (green)
- Handle Template Warning (if applicable):
- If selected views use templates, you’ll see: ``` ⚠️ Template Detected
The following views use templates: • Template: Architectural Plan (15 views) • Template: MEP Coordination (8 views)
Total views that will be affected: 23
Applying filters will affect ALL views using these templates.
Do you want to continue?
[Yes] [No] ```
- Click Yes to proceed (standard workflow)
- Click No to cancel and reconsider selections
- Handle Conflicts (if applicable):
- If target views already have filters with same names: ``` Filters with same names already exist. How would you like to proceed?
○ Merge - Keep existing, add only new filters ⦿ Overwrite - Replace existing with imported settings ○ New Only - Skip existing, import only new filters
[OK] [Cancel] ```
- Merge: Safe option, doesn’t change existing
- Overwrite: Updates existing filters with your settings
- New Only: Ignores duplicates
- Click OK to proceed
- Confirmation:
- Success message appears
- Shows how many views/templates were updated
- Current view remains unchanged
Result:
- Selected filters now exist in all target views/templates
- Filter settings (rules, graphics) are identical
- Source view unchanged
Removing Filters from Views
Use Case: You need to remove outdated filters from multiple views at once.
Step-by-Step:
- Open Any View as Reference:
- Open a view that shows the filters you want to remove
- Doesn’t matter which view - it’s just your reference
-
Launch Visibility Manager
- Select Filters Mode:
- Panel ❶: Click Filters radio button
- Select Filters to Remove:
- Panel ❶: Check filters you want to remove
- These are just references - showing WHAT to remove
- Select Target Views:
- Panel ❷: Check views to remove FROM
- Panel ❸: Check templates to remove FROM (optional)
- Execute Remove:
- Click [REMOVE] button (orange/red)
- Confirm Action:
⚠️ Confirm Removal This will remove X filters from Y views/templates. This action cannot be undone. Continue? [Yes] [No]- Click Yes to proceed
- Click No to cancel
- Template Warning (if applicable):
- Similar to Copy, warns about template-based views
- Confirmation:
- Success message
- Shows how many items were removed
Result:
- Selected filters removed from all target views/templates
- Source view (Panel ❶) remains unchanged
Important:
- This does NOT delete the filter definition from the project
- It only removes the filter from the selected views
- The filter still exists and can be re-applied later
Exporting Filters
Use Case: Save your filter setup to a file for backup, documentation, or import to another project.
Step-by-Step:
- Open the View to Export:
- Open the view containing filters you want to export
- This is your source
-
Launch Visibility Manager
- Select Filters Mode:
- Panel ❶: Click Filters radio button
- Select Filters to Export:
- Panel ❶: Check which filters to export
- You can export all or just some
- Use Search to find specific ones
-
Choose Export Format:
Option A: Excel (.xlsx) - Recommended
- Click [EXPORT] button
- Better formatting, easier to read
Option B: CSV (.csv)
- Click [XLSX] button (despite the name, it creates CSV)
- Use for legacy systems or version control (Git-friendly)
- Choose Save Location:
- File dialog appears
- Select your preferred folder for the export files
- Default name format:
Filters_[ViewType]_[HHMMSS]_[YYYYMMDD]_[ViewName].xlsx - Example:
Filters_3D_145351_20260109_Section View.xlsx - Important: Keep the
Filters_prefix - this identifies the file content for import - You can change the rest of the name as desired
- Note: View name can be in any language supported by Revit/Windows
- Export Completes:
✓ Export Successful Exported: • Filters_3D_145351_20260109_Section View.xlsx (15 filters) • Filters_3D_145351_20260109_Section View.pat (Fill patterns) Location: [User selected folder] [Open Folder] [OK] - Files Created:
- Excel/CSV file: Contains all filter data (always created)
- PAT file: Contains fill/hatch patterns used in filters (only created if filters use custom patterns)
⚠️ CRITICAL: File Names Must Match
- The PAT file name must exactly match the Excel/CSV file name (except for the extension)
- Example:
Filters_3D_145351_20260109_Office.xlsxrequiresFilters_3D_145351_20260109_Office.pat - If you rename the Excel file after export, you MUST also rename the PAT file to match
- Otherwise, the import will show a “Pattern library not found” warning
What’s in the Export:
Excel/CSV columns:
- Filter_Name
- Enable_Filter (Yes/No)
- Visibility (Yes/No)
- Categories (which categories the filter applies to)
- Rules (the filter logic - AND/OR conditions)
- Line_Color, Line_Pattern, Line_Weight
- Fill_Foreground_Color, Fill_Foreground_Pattern
- Fill_Background_Color, Fill_Background_Pattern
- Cut_Line_Color, Cut_Line_Pattern, Cut_Line_Weight
- Cut_Fill_Foreground_Color, Cut_Fill_Foreground_Pattern
- Cut_Fill_Background_Color, Cut_Fill_Background_Pattern
- Transparency
- Halftone (Yes/No)
- Custom_Parameters (if any)
Pattern Library (.pat file):
- Contains definitions of all fill/hatch patterns used in the filters
- File name matches Excel file:
Filters_3D_145351_20260109_Section View.pat - Only created if filters use custom fill patterns (not created if no patterns used)
- Required for import to work correctly with all pattern definitions
- Keep this file with your Excel/CSV file in the same folder
Best Practices:
- Export to a shared network location for team access
- Keep Excel/CSV and pattern files together in same folder
- Maintain the
Filters_orVGOverrides_prefix when renaming files - this helps identify file type - If you rename the Excel file, always rename the pattern file (.pat or .lin) to match - file names must be identical (except extension)
- Use descriptive view names for easier file identification
- Consider version control (Git) for CSV files
Importing Filters
Use Case: Load filters from a previously exported file into your current project.
Step-by-Step:
- Open the Target View:
- Open the view where you want to import filters
- Important: This view WILL be modified
- If it uses a template, ALL views using that template will be affected
-
Launch Visibility Manager
- Select Filters Mode:
- Panel ❶: Click Filters radio button
- Click Import:
- Click [IMPORT] button
- Select File:
- File dialog appears
- Navigate to your exported Excel or CSV file
- Select the file and click Open
- Note: The tool validates file content - if you try to import a VG Overrides file in Filters mode (or vice versa), you’ll get an error message
- Make sure you’re importing the correct file type for the current mode
- Template Warning (if applicable):
- If current view uses a template: ``` ⚠️ Template Detected
Current view uses template: “Architectural Plan” This template is used by 15 views.
Importing will affect ALL 15 views.
Continue?
[Yes] [No] ```
- Click Yes if you want to update the template (common)
- Click No to cancel
- To affect only this view: Remove it from template first in Revit
- Pattern Library Check:
- Tool reads the Excel file content to determine if pattern file is needed
- Only checks for pattern file if the filters actually use custom patterns
- If patterns are needed, tool automatically looks for matching .pat file
- Expected name: Same as Excel file with .pat extension
- Example: If importing
Filters_3D_145351_20260109_Section View.xlsx - Looks for:
Filters_3D_145351_20260109_Section View.pat - Must be in the same folder as the Excel file
- Important: If you renamed the Excel file, you must also rename the PAT file to match
If PAT file missing (when patterns are needed):
⚠️ Pattern Library Not Found Expected: Filters_3D_145351_20260109_Section View.pat Location: [Same folder as the Excel file] Filters will import but custom fill patterns may be missing. Continue without patterns? [Yes] [No]- Click Yes to import anyway (patterns will show as missing)
- Click No to cancel and locate the PAT file
- Custom Parameters Dialog (if applicable):
- If imported filters use custom parameters not in your project: ``` ⚠️ Custom Parameters Detected
The following parameters don’t exist in this project:
• Wall_Finish Type: Text Category: Walls
• Room_Number_Custom Type: Text Category: Rooms
Would you like to create these parameters?
[Yes] [No] [Cancel] ```
- Yes: Tool creates parameters automatically (recommended)
- No: Skip these parameters (filters using them will fail)
- Cancel: Abort import
If you click Yes:
- Parameters are created with correct settings
- Filters using them will work properly
- Conflict Resolution:
- If filters with same names exist: ``` Filters with same names already exist: • Filter 1 • Filter 2
How to proceed?
○ Merge - Keep existing, add only new ⦿ Overwrite - Replace existing with imported ○ New Only - Skip existing, import only new
[OK] [Cancel] ```
- Choose your strategy and click OK
- Import Completes:
✓ Import Successful

Imported 15 filters to:
• Level 1 - Architectural

Via template: Architectural Plan
Total views affected: 15

Custom parameters created: 2

[OK]
Result:
- Filters now exist in current view (and all views sharing its template)
- Filter rules, graphics, settings are identical to exported version
- Custom parameters created if needed
- Patterns imported from PAT file
Troubleshooting Import:
Problem: Filters import but show “Value” instead of actual values
- Cause: Bug in older versions
- Solution: Update to latest version (v1.0.1+)
Problem: “Pattern not found” warnings
- Cause: PAT file missing or in different location
- Solution: Place PAT file in same folder as Excel file, re-import
Problem: Filters don’t appear in view
- Cause: Filters not enabled, or view uses template without them
- Solution: Check View → Visibility/Graphics → Filters tab
Problem: Custom parameters not created
- Cause: Clicked “No” in custom parameters dialog
- Solution: Re-import and click “Yes”, or create parameters manually
Working with VG Overrides
VG (Visibility/Graphics) Overrides control how entire categories display - colors, line weights, patterns, transparency. The workflow is identical to Filters, just using different content.
Supported Categories
IB-BIM Visibility Manager supports all Revit main categories across all types:
- ✅ Model Categories - Walls, Doors, Windows, MEP elements, Structure, Site, etc.
- ✅ Annotation Categories - Dimensions, Tags, Text Notes, Symbols, Detail Items, etc.
- ✅ Analytical Categories - Loads, Links, Nodes, Boundary Conditions, etc.
Example (Revit 2025/2026): 292 main categories supported:
- 96 Model categories
- 180 Annotation categories
- 16 Analytical categories
The application automatically detects and supports all categories available in your Revit version.
Current Scope (v1.0.0)
✅ Supported:
- All main categories (Model, Annotation, Analytical)
- VG Override copying and removal
- Export/Import operations
⚠️ Limitation:
- Subcategories not yet supported (planned for v2.0)
What this means:
- ✅ Walls (main category) - Fully supported
- ⚠️ Walls > Exterior (subcategory) - Coming in v2.0
Most BIM workflows rely primarily on main category overrides. Subcategories are advanced refinements used in specific scenarios.
Copying VG Overrides
Use Case: Standardize category graphics across multiple views (all walls red, all doors blue, etc.)
Step-by-Step:
- Open Source View:
- Open view with the VG overrides you want to copy
-
Launch Visibility Manager
- Select V/G Overrides Mode:
- Panel ❶: Click V/G Overrides radio button
- Panel turns light blue
- Shows categories with overrides in current view
- Select Categories:
- Panel ❶: Check categories to copy
- Example categories you might see:
- Planting (👁 Hidden)
- Mass (👁 Hidden)
- Parking (👁 Hidden)
- Topography (👁 Hidden)
- Floors (👁 Hidden)
- Parts (👁 Hidden)
- The (👁 Hidden) indicates visibility status
- Select Targets:
- Panel ❷: Select target views
- Panel ❸: Select target templates (optional)
- Execute Copy:
- Click [COPY] (green button)
- Handle template warnings if applicable
- Conflict resolution (Merge/Overwrite/New Only)
- Confirmation:
- Success message shows how many categories copied to how many views
Result:
- Selected category graphics now identical in all target views
- Line colors, patterns, weights, fills, transparency all copied
Example Use Case:
- Coordination views: Set structural elements to blue, MEP to red
- Export these overrides
- Import to all team members’ coordination views
- Everyone sees the same colors in meetings
Removing VG Overrides
Step-by-Step:
- Open Reference View:
- Any view showing the categories you want to remove overrides from
-
Launch Visibility Manager
- Select V/G Overrides Mode:
- Panel ❶: Click V/G Overrides radio button
- Select Categories:
- Check categories whose overrides you want to remove
- Select Targets:
- Panel ❷: Views to remove FROM
- Panel ❸: Templates to remove FROM
- Execute Remove:
- Click [REMOVE] (orange button)
- Confirm action in dialog
- Handle template warnings
Result:
- Category overrides removed from target views
- Categories return to default graphics
Exporting VG Overrides
Step-by-Step:
- Open Source View:
- View with VG overrides to export
-
Launch Visibility Manager
- Select V/G Overrides Mode:
- Panel ❶: Click V/G Overrides radio button
- Select Categories:
- Check categories to export
- Or Select All
- Export:
- Click [EXPORT] for Excel
- Or [XLSX] for CSV
- Choose Location:
- File dialog appears - select your preferred folder
- Default name format:
VGOverrides_[ViewType]_[HHMMSS]_[YYYYMMDD]_[ViewName].xlsx - Example:
VGOverrides_3D_145408_20260109_Section View.xlsx - Important: Keep the
VGOverrides_prefix - this identifies the file content for import - You can change the rest of the name as desired
- Note: View name can be in any language supported by Revit/Windows
- Files Created:
- Excel/CSV file: Contains all VG override data (always created)
- LIN file: Contains line patterns used in overrides (only created if overrides use custom line patterns)
- Example:
VGOverrides_3D_145408_20260109_Section View.lin
⚠️ CRITICAL: File Names Must Match
- The LIN file name must exactly match the Excel/CSV file name (except for the extension)
- Example:
VGOverrides_3D_145408_20260109_Office.xlsxrequiresVGOverrides_3D_145408_20260109_Office.lin - If you rename the Excel file after export, you MUST also rename the LIN file to match
- Otherwise, the import will show a “Pattern library not found” warning
What’s Exported:
- Category name
- Visibility (Show/Hide)
- Line color, pattern, weight
- Fill foreground/background colors and patterns
- Cut line settings
- Cut fill settings
- Transparency
- Halftone setting
Importing VG Overrides
Step-by-Step:
- Open Target View:
- View where you want VG overrides
- This view will be modified
-
Launch Visibility Manager
- Select V/G Overrides Mode:
- Panel ❶: Click V/G Overrides radio button
- Click Import:
- Click [IMPORT] button
- Select File:
- Choose previously exported VG Excel/CSV file
- Note: The tool validates file content - if you try to import a Filters file in VG Overrides mode (or vice versa), you’ll get an error message
- Make sure you’re importing the correct file type for the current mode
- Handle Dialogs:
- Template warning (if applicable)
- Pattern library check (tool reads Excel content to see if .lin file is needed)
- If needed: looks for matching .lin file (same name as Excel, different extension)
- Important: File names must match exactly, e.g.,
VGOverrides_3D_145408_20260109_Office.xlsxneedsVGOverrides_3D_145408_20260109_Office.lin - Conflict resolution (Merge/Overwrite/New Only)
- Confirmation:
- Success message
- Categories now have imported graphics
Note: VG overrides don’t use custom parameters, so that dialog won’t appear.
Advanced Features
Working with View Templates
Understanding Template Behavior:
When you select a view that uses a template as a target, the tool applies changes to the template itself, not the view. This affects all views using that template.
Why This Happens:
- This is Revit’s architecture, not a tool limitation
- When a view uses a template, filter and VG settings are “locked” to the template
- You cannot modify them on the view without breaking the template link
The Tool’s Template Detection:
Automatic Detection:
- Tool scans selected target views
- Identifies which ones use templates
- Shows clear warning before proceeding
Warning Dialog Details:
⚠️ Template Detected

The following views use templates:

- Template: "Architectural Plan"
  Views using it: 15
  - Level 1 - Architectural
  - Level 2 - Architectural
  - Level 3 - Architectural
  ... (12 more)

- Template: "Site Plan"
  Views using it: 3
  - Site - Existing
  - Site - Proposed
  - Site - Demolition

Total views that will be affected: 18

Applying changes will modify these templates.
All views using them will be updated.

Do you want to continue?

[Yes] [No]
Your Options:
Option 1: Continue (Standard Workflow)
- Click [Yes]
- Changes apply to templates
- All views using those templates update
- This is usually what you want!
- Ensures consistency across related views
Option 2: Cancel and Reconsider
- Click [No]
- No changes made
- Review your selections
- Decide if you want to affect that many views
Option 3: Work with Templates Directly
- Don’t select views from Panel ❷
- Instead, select templates from Panel ❸
- More explicit - you know you’re modifying templates
- Same result, clearer intent
Option 4: Break the Template Link
- If you truly want to affect only ONE view using a template:
- Close Visibility Manager
- In Revit: Open the view
- Properties panel → View Template →
<None> - View is now independent
- Launch Visibility Manager and apply changes
- Only this view will be affected
Best Practices:
For Standardization (Most Common):
- Work with templates (Panel ❸)
- Update the template once
- All views update automatically
- Perfect for coordination and office standards
For One-Off Views:
- Remove view from template first
- Or create view without a template
- Then use the tool
For Complex Scenarios:
- Use Visibility Manager in multiple passes:
- Pass 1: Update Template A
- Pass 2: Update Template B
- Pass 3: Update independent views
Custom Parameters
What Are Custom Parameters:
Custom parameters are user-created parameters (not built into Revit) used in filter rules.
Types:
- Project Parameters - Available in one project
- Shared Parameters - Can be used across projects
- Type vs. Instance - Where parameter is stored
Examples:
Wall_Finish(Text) - Stores wall finish materialRoom_Department(Text) - Which department uses the roomElement_Phase_Code(Text) - Custom phase identifier
How the Tool Handles Custom Parameters:
During Export:
- Tool detects filters using custom parameters
- Extracts parameter definitions:
- Parameter name
- Data type (Text, Integer, Number, Yes/No, etc.)
- Category (Walls, Doors, Rooms, etc.)
- Type or Instance parameter
- Saves this information in Excel file in “Custom_Parameters” column
During Import:
- Tool reads Custom_Parameters column
- Checks if parameters exist in target project
- If missing, shows interactive dialog: ``` ⚠️ Custom Parameters Detected
The following custom parameters are required by imported filters but don’t exist in this project:
┌────────────────────────────────────────────────────┐ │ Parameter: Wall_Finish │ │ Type: Text │ │ Category: Walls │ │ Parameter Type: Instance │ │ │ │ Used by filters: │ │ • Exterior Walls - Finish Type │ │ • Interior Walls - By Finish │ └────────────────────────────────────────────────────┘
┌────────────────────────────────────────────────────┐ │ Parameter: Room_Department │ │ Type: Text │ │ Category: Rooms │ │ Parameter Type: Instance │ │ │ │ Used by filters: │ │ • Rooms - IT Department │ │ • Rooms - HR Department │ └────────────────────────────────────────────────────┘
Would you like to create these parameters?
[Yes - Create All] [No - Skip] [Cancel Import]
**Click Options:**

**[Yes - Create All]:**
- Tool creates all missing parameters automatically
- Parameters created with correct:
  - Name
  - Data type
  - Category binding
  - Type/Instance setting
- Filters using them will work correctly
- **Recommended option!**

**[No - Skip]:**
- Parameters not created
- Import continues
- Filters using these parameters will be imported BUT:
  - Filter rules referencing missing parameters will fail
  - These filters won't work properly
  - Revit may show errors

**[Cancel Import]:**
- Aborts entire import
- No changes made
- Use this if you need to create parameters manually first

**After Clicking Yes:**
✓ Custom Parameters Created
Successfully created 2 parameters:
- Wall_Finish (Text, Walls, Instance)
- Room_Department (Text, Rooms, Instance)
Continuing with import…
**Manual Creation (Alternative):**

If you prefer to create parameters yourself:

1. In Revit: Manage tab → Project Parameters
2. Click "Add..."
3. Create parameter with exact same:
   - Name (case-sensitive!)
   - Type (Text, Integer, etc.)
   - Categories
   - Type or Instance
4. Then import filters - tool will find them

**Best Practices:**

**For Organization Standards:**
- Create a master filters export with all custom parameters
- Import to project template
- Parameters created once, available in all new projects

**For Team Collaboration:**
- Document custom parameters used
- Share filter exports with parameter definitions
- Everyone can recreate parameters easily

**For Shared Parameters:**
- If using shared parameters file, load it first
- Then import filters
- Tool will detect shared parameters and use existing definitions

**Troubleshooting:**

**Problem:** Import says "Parameter not found" but you created it
- **Cause:** Name doesn't match exactly (case-sensitive)
- **Solution:** Delete parameter, let tool create it

**Problem:** Filter imported but doesn't work
- **Cause:** Parameter was skipped during import
- **Solution:** Re-import and click "Yes" to create parameters

**Problem:** Parameter created in wrong category
- **Cause:** Tool created based on export data
- **Solution:** Delete and recreate manually with correct categories

---

### Pattern Library Management

**Why Pattern Files:**

Revit fill patterns (like "Diagonal Crosshatch", "Sand - Dense") are stored separately from filters. When you export filters that use patterns, the tool must also export the pattern definitions.

**Automatic Pattern Export:**

When you export filters, the tool:

1. **Scans** all selected filters for pattern usage:
   - Surface fill foreground patterns
   - Surface fill background patterns
   - Cut fill foreground patterns
   - Cut fill background patterns

2. **Collects** unique patterns used

3. **Creates** a .PAT file with pattern definitions:
   - File name matches Excel file exactly (e.g., `Filters_3D_145351_20260109_Office.pat`)
   - Saved in same location as Excel file
   - Contains both drafting and model fill patterns

4. **Includes** metadata:
;; Pattern Library ;; Exported: 2025-11-02 ;; Project: Office Building ;; Total Patterns: 12
**Pattern File Format (.PAT):**

Standard Revit pattern file format:
*Diagonal_45 ;Type=Drafting 45, 0,0, 0.006562, 0
*Sand_-_Dense ;Type=Drafting 0, 0,0, 0.003333, 0.013333 120, 0.005, 0.001667, 0.003333, 0.013333
**Automatic Pattern Import:**

When you import filters, the tool:

1. **Looks** for matching .pat file:
   - Same base name as Excel file
   - Same folder as Excel file
   - Example: Importing `Filters_3D_145351_20260109_Office.xlsx` looks for `Filters_3D_145351_20260109_Office.pat`

2. **If found:**
   - Reads all pattern definitions
   - Imports patterns to current project
   - Patterns become available in Revit
   - Filters display correctly

3. **If not found:**
   - Shows warning dialog
   - You can continue without patterns (filters will have missing pattern references)
   - Or cancel to locate the .PAT file

**Manual Pattern Management:**

**Viewing Patterns:**
- In Revit: Manage tab → Additional Settings → Fill Patterns
- Shows all patterns in project (including imported ones)

**Loading Patterns Manually:**
1. Manage tab → Additional Settings → Fill Patterns
2. Click "Load..."
3. Select .PAT file from Visibility Manager export
4. Patterns import to project
5. Then import filters - they'll find the patterns

**Understanding Pattern File Types:**

The tool exports different pattern file types depending on what you're exporting:

| Export Type | Pattern File | Contains | When Created |
|-------------|--------------|----------|--------------|
| **Filters** | `.pat` file | Fill/Hatch patterns (surface patterns) | Only if filters use custom fill patterns |
| **VG Overrides** | `.lin` file | Line patterns (line styles) | Only if overrides use custom line patterns |

**Examples:**
- Exporting Filters: `Filters_3D_145351_20260109_Office.xlsx` + `Filters_3D_145351_20260109_Office.pat`
- Exporting VG: `VGOverrides_3D_145408_20260109_Office.xlsx` + `VGOverrides_3D_145408_20260109_Office.lin`

**Key Points:**
- Each export type has its own pattern file type
- Pattern files are only created when custom patterns are actually used
- File names always match exactly (same base name, different extension)
- Both files must be in the same folder for import to work correctly

**Creating Pattern Library:**

For office standards:

1. **Create Master Project:**
   - Set up all standard patterns
   - Create filters using these patterns
   - Export filters (creates .PAT automatically)

2. **Distribute:**
   - Share .XLSX and .PAT files with team
   - Import to project templates
   - All projects have consistent patterns

**Troubleshooting:**

**Problem:** "Pattern not found" after import
- **Cause:** PAT file missing or in different location
- **Solution 1:** Place .PAT in same folder as .XLSX, re-import
- **Solution 2:** Load patterns manually first, then import filters

**Problem:** Pattern imported but looks different
- **Cause:** Pattern definition mismatch (scale, angles different)
- **Solution:** Check pattern in Fill Patterns dialog, edit if needed

**Problem:** Some patterns import, others don't
- **Cause:** Pattern names conflict with existing patterns in project
- **Solution:** Tool uses existing patterns if names match

**Best Practices:**

✓ **Always keep .PAT and .XLSX together** in same folder
✓ **Use descriptive PAT file names** matching Excel files
✓ **Version control** - include patterns in your filter library
✓ **Test imports** in blank project first to verify patterns
✓ **Document patterns** - list which filters use which patterns

---

### Search and Filtering

The tool provides powerful search and filtering to help you work with large numbers of items quickly.

**Search Boxes:**

Available in all three panels:

**Panel ❶ - Current View:**
- Search filters/VG categories by name
- Real-time filtering as you type
- Example: Type "wall" to see only items with "wall" in name

**Panel ❷ - Target Views:**
- Search views by name or type
- Example: Type "level 1" to see all Level 1 views

**Panel ❸ - Target Templates:**
- Search templates by name
- Example: Type "arch" to find architectural templates

**How Search Works:**

- **Real-time:** Results update as you type
- **Case-insensitive:** "Wall" and "wall" both work
- **Partial matching:** Searches within names, not just start
- **Maintains selections:** Checking items doesn't change search
- **Clear search:** Delete text to show all items again

**Example:**
Search: “exterior”
Results: ☑ Exterior Walls - Type A ☐ Exterior Doors - Main Entry ☑ Exterior Windows - Vision Glass
**View Type Filters (Panel ❷):**

Quick filtering by view type:
View Types: ☑ 3D Views (10) ← Check to show only 3D views ☐ Floor Plans (7) ← Uncheck to hide floor plans ☐ Elevations (4) ☐ Ceiling Plans (2)
**How It Works:**
- Numbers in parentheses = total of that type in project
- Check a type to show only those views
- Uncheck to hide
- Multiple types can be checked simultaneously
- Counter at top updates: "15" (showing 15 of 23 total)

**Combining Search and Type Filters:**

You can use both together:

1. **Check view types:** Show only Floor Plans and Sections
2. **Use search:** Type "architectural"
3. **Result:** Only architectural floor plans and sections

**Template Type Filters (Panel ❸):**

Same concept as view types:
Template Types: ☑ Floor Plans (2) ☐ Sections (2) ☐ 3D Views (1) ☐ Ceiling Plans (0)
**Select All Checkbox:**

Each panel has a "Select All" checkbox:

**Behavior:**
- Checks/unchecks all **currently visible** items
- Respects search and type filters
- Only affects what you can see

**Example:**
1. Search: "level 1"
2. Shows 10 views with "level 1" in name
3. Click "Select All"
4. All 10 visible views checked
5. Hidden views (not matching search) NOT checked

**Advanced Filtering Techniques:**

**Technique 1: Progressive Filtering**
1. Check view types: "Floor Plans"
2. Search: "level"
3. Select All
4. Now only Level floor plans are selected

**Technique 2: Exclusion**
1. Select All (everything checked)
2. Search: "demo"
3. Uncheck visible items
4. Clear search
5. Result: Everything except demo views selected

**Technique 3: Multi-Panel Selection**
1. Panel ❷: Filter and select specific views
2. Panel ❸: Simultaneously select templates
3. Execute operation on both sets

**Counters:**

Bottom of each panel shows selection count:
Panel ❶: “3 filters selected” (from total in view) Panel ❷: “15 views selected” (from total shown) Panel ❸: “2 templates selected” (from total shown)
These update in real-time as you check/uncheck items.

**Tips:**

✓ **Use search first** to narrow down before selecting
✓ **Type filters are sticky** - remain checked between operations
✓ **Search is cleared** when switching modes (Filters ↔ VG)
✓ **Selections are cleared** when closing window
✓ **Be aware of filters** - Select All only affects visible items


## Real-World Workflows {#real-world-workflows}

### For BIM Managers

**Scenario 1: Standardize Office Template**

**Goal:** Create company standard filters and distribute to all projects

**Steps:**

1. **Create Master Filters:**
   - Open company template or well-configured project
   - Set up all standard filters:
     - Demolition elements (red, dashed)
     - New construction (black, solid)
     - Phase filters
     - Discipline-specific filters (Arch, Struct, MEP)

2. **Export Master Library:**
   - Launch Visibility Manager
   - Select Filters mode
   - Select All filters
   - Export to network location: `\\Company\BIM\Standards\Filters_FloorPlan_153022_20260109_Standards Library.xlsx`
   - PAT file auto-created (if patterns used): `Filters_FloorPlan_153022_20260109_Standards Library.pat`

3. **Document for Team:**
   - Create README in same folder
   - Explain what each filter does
   - Include import instructions

4. **Distribute to Projects:**
   - Team members open their projects
   - Launch Visibility Manager
   - Import from network location
   - All standard filters now in their project

5. **Update Company Template:**
   - Import to official company template
   - All new projects start with standard filters

**Scenario 2: Audit Filter Usage Across Projects**

**Goal:** Understand which filters are being used, identify inconsistencies

**Steps:**

1. **Export from Multiple Projects:**
   - Open Project A → Export filters → `ProjectA_Filters.xlsx`
   - Open Project B → Export filters → `ProjectB_Filters.xlsx`
   - Repeat for all projects

2. **Compare in Excel:**
   - Open all exported Excel files
   - Compare filter names
   - Look for:
     - Naming inconsistencies ("Ext Walls" vs "Exterior Walls")
     - Duplicate filters with different rules
     - Missing filters that should be standard

3. **Create Standardized Version:**
   - Create new master file with corrected names
   - Standardize rules across filters
   - Export from clean project

4. **Re-import to Projects:**
   - Use Overwrite mode to update existing filters
   - Ensures consistency across all projects

**Scenario 3: Backup and Version Control**

**Goal:** Maintain history of filter configurations

**Steps:**

1. **Regular Exports:**
   - Export filters monthly or at key milestones
   - File name includes timestamp automatically
   - Rename if needed to add phase info: `Filters_FloorPlan_153022_20260309_SD Phase.xlsx`
   - Keep original timestamp for traceability

2. **Store in Project Folder:**
Project/ ├── BIM/ │ ├── Filters/ │ │ ├── Filters_FloorPlan_153022_20260309_SD Phase.xlsx │ │ ├── Filters_FloorPlan_153022_20260309_SD Phase.pat │ │ ├── Filters_FloorPlan_160445_20260615_DD Phase.xlsx │ │ ├── Filters_FloorPlan_160445_20260615_DD Phase.pat
3. **Use Git for CSV Files:**
   - Export as CSV instead of Excel
   - Commit to version control
   - Track changes over time
   - See diffs in filter rules

4. **Recovery:**
   - If filters get messed up, import from previous version
   - Compare current vs. previous to see what changed

---

### For BIM Coordinators

**Scenario 1: Coordination Meeting Prep**

**Goal:** Set up identical filter sets across all discipline models for coordination meeting

**Steps:**

1. **Create Coordination Filter Set:**
   - In architectural model, create filters:
     - Show only Level 1 (for Level 1 coordination)
     - Show only structural elements
     - Show only MEP systems
     - Color-code by discipline
   - Export: `Coordination_Level1_2025-11.xlsx`

2. **Distribute to Team:**
   - Email Excel + PAT files to structural and MEP coordinators
   - Or place in shared BIM folder

3. **Team Imports:**
   - Structural coordinator: Opens struct model, imports filters
   - MEP coordinator: Opens MEP model, imports filters
   - Everyone now has identical filters

4. **Meeting Result:**
   - All coordinators see same elements
   - Same color-coding (Arch=black, Struct=blue, MEP=red)
   - No confusion about "it looks different on my screen"

**Scenario 2: Clash Detection View Setup**

**Goal:** Create consistent views for Navisworks clash detection export

**Steps:**

1. **Create Discipline Isolation Filters:**
   - Filter: Structural Only (show only structural categories)
   - Filter: MEP - HVAC Only (show only HVAC)
   - Filter: MEP - Plumbing Only
   - Filter: MEP - Electrical Only

2. **Export Filter Set:**
   - Export: `ClashDetection_Filters.xlsx`

3. **Import to All Models:**
   - Each discipline model imports the filters
   - Creates views with consistent filter application

4. **Navisworks Export:**
   - Views exported to Navisworks have consistent visibility
   - Clash reports organized by discipline
   - Easier to assign clash responsibility

**Scenario 3: Trade Package Views**

**Goal:** Create view sets for subcontractor coordination

**Steps:**

1. **HVAC Package:**
   - Create filters showing only HVAC work
   - Include phase filters (Demo, New, Existing)
   - Export: `HVAC_Package_Filters.xlsx`

2. **Plumbing Package:**
   - Create plumbing-specific filters
   - Export: `Plumbing_Package_Filters.xlsx`

3. **Distribute to Subs:**
   - HVAC sub imports HVAC filters
   - Sees only relevant work
   - Less confusion, faster coordination

**Scenario 4: Issue Tracking by Discipline**

**Goal:** Filter clash issues by responsible discipline

**Steps:**

1. **Create Responsibility Filters:**
   - If using custom parameter "Clash_Responsibility"
   - Filter: Architectural Issues (where Responsibility = ARCH)
   - Filter: Structural Issues (where Responsibility = STR)
   - Filter: MEP Issues (where Responsibility = MEP)

2. **Export and Share:**
   - All coordinators import same filters
   - Can quickly isolate their issues
   - Track resolution progress

---

### For Template Creators

**Scenario 1: Multi-Office Template System**

**Goal:** Create regional variants of company template

**Steps:**

1. **Base Template:**
   - Create master template with core filters
   - Export: `Corporate_Base_Filters.xlsx`

2. **Regional Customization:**
   - West Coast office adds local code filters
   - Export: `Corporate_WestCoast_Filters.xlsx`
   - East Coast adds their local filters
   - Export: `Corporate_EastCoast_Filters.xlsx`

3. **Distribution:**
   - Each office imports base + their regional filters
   - Maintains consistency while allowing customization

**Scenario 2: Template View Setup**

**Goal:** Apply filters to all views in a template at once

**Steps:**

1. **Create Filter Library:**
   - Create all standard filters
   - Don't apply to any views yet

2. **Export Filters**

3. **Create Template Views:**
   - Create all view types needed (Floor Plan, Section, etc.)
   - Create one View Template per view type

4. **Import to Templates:**
   - Open each template view
   - Import filters
   - Since it's a template, all views using it get the filters

5. **Result:**
   - One import operation affects 20+ views via template
   - Much faster than manual application

**Scenario 3: Filter Evolution Over Template Versions**

**Goal:** Track how filters change across template versions

**Steps:**

1. **Version 1.0 (2024):**
   - Export filters: `Template_v1.0_Filters.xlsx`

2. **Version 1.1 (2024 Q2):**
   - Add new filters for code compliance
   - Export: `Template_v1.1_Filters.xlsx`

3. **Version 2.0 (2025):**
   - Major update, revised filter logic
   - Export: `Template_v2.0_Filters.xlsx`

4. **Compare:**
   - Open all three Excel files
   - See what was added, changed, removed
   - Document changes in template release notes

5. **Selective Updates:**
   - Projects can import just the new filters (New Only mode)
   - Or update everything (Overwrite mode)


## Troubleshooting {#troubleshooting}

### Filters Don't Appear in View After Import

**Symptoms:**
- Import reports success
- But filters not visible in Visibility/Graphics dialog
- View looks unchanged

**Possible Causes & Solutions:**

**Cause 1: Filters Not Enabled**

Filters can exist but be disabled.

**Solution:**
1. In Revit: View → Visibility/Graphics (VG)
2. Click "Filters" tab
3. Check "Visibility" column - filters should have checkmarks
4. If unchecked, check them
5. Click OK

**Cause 2: View Uses Template Without These Filters**

If view uses a template, filters must be in the template.

**Solution:**
1. Check if view uses template: Properties → View Template
2. If yes, import must be done to a view using that template
3. Or import directly to template (open a view using it)

**Cause 3: Filter Categories Don't Match View**

Example: Wall filters won't work in a Structural Plan (shows only structural)

**Solution:**
1. Check filter categories in Excel export
2. Verify view can display those categories
3. Adjust view's Visibility/Graphics to show needed categories

**Cause 4: Filter Rules Reference Missing Elements**

If filter looks for elements that don't exist, nothing shows.

**Solution:**
1. Check filter rules in Visibility/Graphics
2. Verify elements exist that match the rules
3. Test by creating a simple element that should match

---

### "Value" Appears Instead of Actual Values

**Symptoms:**
- After import, filter rules show "Value" instead of actual text/numbers
- Example: Rule shows "Wall Type equals Value" instead of "Wall Type equals CMU-8inch"

**Cause:**
- Bug in tool version 1.0.0
- Excel export/import issue

**Solution:**
- **Update to version 1.0.1 or later**
- This bug was fixed in the update
- Re-export from source project
- Re-import to target project

**Workaround (if can't update):**
1. Note the actual values from source view
2. After import, manually edit each filter rule
3. Replace "Value" with correct value
4. Tedious but works

---

### Pattern Not Found Warnings (Fill Patterns or Line Patterns)

**Symptoms:**
- After import, Revit shows warnings: "Pattern 'XXX' not found" or "Line pattern 'XXX' not found"
- **For Filters:** Filters import successfully but use default solid fill pattern instead of custom hatches
- **For VG Overrides:** Categories import but use default line patterns instead of custom line styles

**Cause:**
- Pattern file (.pat or .lin) missing during import
- Pattern file in different location than Excel file
- Pattern file has different name than expected
- **Excel file was renamed after export, but pattern file was not renamed to match**

**Solution 1: Rename Pattern File to Match Excel**
1. Find the pattern file (.pat for Filters, .lin for VG) from original export
2. Rename it to match the Excel file name exactly (keep the correct extension)
3. Examples:
   - Filters: Excel `Filters_3D_145351_20260109_Office_RENAMED.xlsx` needs PAT `Filters_3D_145351_20260109_Office_RENAMED.pat`
   - VG: Excel `VGOverrides_3D_145408_20260109_Office_RENAMED.xlsx` needs LIN `VGOverrides_3D_145408_20260109_Office_RENAMED.lin`
4. Move both files to same folder if needed
5. Re-import

**Solution 2: Locate and Move Pattern File**
1. Find the pattern file from original export
2. Move it to same folder as Excel file
3. Ensure names match exactly:
   - **Filters example:** Excel `Filters_3D_145351_20260109_Office.xlsx` with PAT `Filters_3D_145351_20260109_Office.pat`
   - **VG example:** Excel `VGOverrides_3D_145408_20260109_Office.xlsx` with LIN `VGOverrides_3D_145408_20260109_Office.lin`
4. Re-import

**Solution 3: Manual Pattern Load**
- **For Fill Patterns (Filters):**
  1. In Revit: Manage tab → Additional Settings → Fill Patterns
  2. Click "Load..."
  3. Browse to .pat file location
  4. Select and load
  5. Patterns now available in project
  6. Re-import filters (or they might work now)

- **For Line Patterns (VG Overrides):**
  1. In Revit: Manage tab → Additional Settings → Line Patterns
  2. Click "Load..."
  3. Browse to .lin file location
  4. Select and load
  5. Line patterns now available in project
  6. Re-import VG overrides

**Solution 4: Accept Default Patterns**
- If custom patterns are not critical, you can continue without them
- Filters/VG overrides will work functionally, just won't display with custom patterns
- You can manually assign patterns later:
  - For Filters: Edit filter graphics in Visibility/Graphics dialog
  - For VG: Edit category graphics in Visibility/Graphics dialog

**Prevention:**
- Always keep Excel and pattern files (.pat or .lin) together in the same folder
- **If you rename Excel file, immediately rename the pattern file to match**
- Store both files in same location
- Maintain matching file names (same base name, different extensions only)

---

### Custom Parameters Not Created

**Symptoms:**
- Import completes
- Filters import
- But filters using custom parameters don't work
- Revit errors: "Parameter XXX not found"

**Cause:**
- Clicked "No" in custom parameters dialog during import
- Or dialog didn't appear (bug)

**Solution 1: Re-Import**
1. Delete imported filters (optional)
2. Re-run import
3. When custom parameters dialog appears, click "Yes"
4. Parameters created, filters work

**Solution 2: Create Parameters Manually**
1. Check Excel export, "Custom_Parameters" column
2. Note parameter details:
   - Name
   - Type (Text, Integer, etc.)
   - Category
   - Instance or Type
3. In Revit: Manage → Project Parameters
4. Create each parameter with exact settings
5. Filters should now work

**Solution 3: Edit Filter Rules**
1. If parameters can't be created (e.g., wrong category)
2. Edit imported filters
3. Change rules to use different parameters
4. Or remove rules using custom parameters

---

### Filters Import But Show Empty Rules

**Symptoms:**
- Filters exist in project
- But when opened, rule fields are empty
- Or rules show but don't filter anything

**Cause:**
- Excel file corrupted
- Rule syntax not parsed correctly
- Complex nested rules not supported

**Solution 1: Check Excel File**
1. Open exported Excel file
2. Check "Rules" column for filter
3. Verify syntax looks correct
4. Example: `(Category = Walls) AND (Type Name Contains "Exterior")`

**Solution 2: Simplify Rules**
1. If rules are very complex with nested AND/OR
2. Break into multiple simpler filters
3. Export simpler filters
4. Import works better

**Solution 3: Re-Export from Source**
1. Go back to source project
2. Verify filters work there
3. Re-export
4. Try import again with fresh file

---

### Import Fails with "Error" Message

**Symptoms:**
- Import dialog appears
- Select file
- Error message: "Error importing filters"
- No details provided

**Possible Causes & Solutions:**

**Cause 1: File Format Issue**
- Excel file corrupted
- Wrong file version

**Solution:**
- Re-export from source
- Use Excel (not CSV) for debugging
- Try CSV instead of Excel

**Cause 2: Revit API Error**
- Current view in bad state
- Template issues

**Solution:**
- Close Visibility Manager
- Open different view
- Try import again

**Cause 3: Large File**
- 100+ filters might timeout

**Solution:**
- Break into smaller exports
- Import in batches

**Cause 4: Wrong File Type**
- Trying to import VG Overrides file in Filters mode
- Trying to import Filters file in VG Overrides mode
- File doesn't match the internal format expected

**Solution:**
1. Check the file name prefix:
   - Filters files should start with `Filters_`
   - VG Overrides files should start with `VGOverrides_`
2. Make sure you're in the correct mode:
   - Filters mode for importing filter files
   - V/G Overrides mode for importing VG files
3. If you renamed the file, verify it came from the correct export type

**To Report Issues:**

**Step 1: Copy Errors from Results Window** (Recommended)
1. Click anywhere in the Results Window
2. Press **Ctrl+A** (Select All)
3. Press **Ctrl+C** (Copy)
4. Paste into email to **itzikb.bim@gmail.com**

**Step 2: Send Log Files** (Only if requested by support)
- Log files location: `C:\ProgramData\IB-BIM\VisibilityManager\Logs\`
- Attach the relevant log file to your email

---

### COPY Operation Does Nothing

**Symptoms:**
- Select filters/VG in Panel ❶
- Select targets in Panels ❷/❸
- Click COPY
- Success message appears
- But target views unchanged

**Possible Causes:**

**Cause 1: Template Overriding**
- Target views use templates
- But you clicked "No" in template warning
- Changes not applied

**Solution:**
- Re-run COPY
- Click "Yes" in template warning

**Cause 2: Wrong View Open**
- After COPY, still looking at original view
- Need to open target view to see changes

**Solution:**
- Open one of the target views
- Check Visibility/Graphics → Filters tab
- Filters should be there

**Cause 3: Filters Already Exist**
- Filters with same names already in targets
- Chose "New Only" mode
- Nothing new to add

**Solution:**
- Use "Overwrite" mode instead
- Or "Merge" if you want both

---

### Performance Issues

**Symptoms:**
- Tool slow to open
- Selections lag
- Operations take long time

**Causes & Solutions:**

**Cause 1: Large Project**
- 1000+ views
- 200+ filters

**Solution:**
- Use search to narrow down lists
- Use type filters to reduce view count
- Works normally with filtering

**Cause 2: Network Location**
- Project file on slow network
- Tool accessing file repeatedly

**Solution:**
- Use "Work offline" in Revit
- Or copy project local temporarily

**Cause 3: Revit Performance**
- General Revit slowness
- Not tool-specific

**Solution:**
- Close unused views
- Purge unused elements
- Standard Revit optimization

---

### Excel Export Opens But Is Empty

**Symptoms:**
- Export reports success
- Open Excel file
- Only headers, no data rows

**Cause:**
- Current view has no filters/VG overrides
- Or all filters are unchecked (none selected)

**Solution:**
1. Open a view that has filters
2. Launch tool
3. Make sure filters are checked in Panel ❶
4. Export again

**Or:**
- This was a bug in early versions
- Update to latest version

---

### Lost Work - Forgot to Save Project

**Symptoms:**
- Did all the import/copy work
- Closed Revit without saving
- Changes lost

**Prevention:**
- Visibility Manager doesn't auto-save
- Always save project after operations
- Consider "Save As" before major imports

**Recovery:**
- No automatic recovery
- Must re-do the operations
- But Excel files remain - just re-import

---

### Getting Help

**Self-Service:**
1. Check this User Guide
2. Check FAQ.md
3. Watch video tutorials
4. Check debug log

**Email Support:**

📧 **itzikb.bim@gmail.com**

**Include:**
1. **Error details from Results Window** (copy with Ctrl+A, Ctrl+C)
2. Revit version (2023/2024/2025/2026)
3. Tool version (shown in window: "Ver: 1.0.0")
4. What you were trying to do (step-by-step)
5. What happened vs. what you expected
6. Screenshots (optional but helpful)

**Log files** (only send if support requests them):
- Location: `C:\ProgramData\IB-BIM\VisibilityManager\Logs\`
- Contains technical debugging information

**Response Time:**
- Typically 2-3 business days
- Critical bugs (tool doesn't work): Faster response

**Before Emailing:**
- Try troubleshooting steps above
- Check if issue reproducible
- Try on different view/project if possible

---

## Appendix

### Keyboard Shortcuts

**In Visibility Manager Window:**
- `Ctrl+F` - Focus search box (Panel ❶)
- `Tab` - Move between panels
- `Space` - Check/uncheck selected item
- `Ctrl+A` - Select All (when list focused)
- `Esc` - Cancel/Close window

### File Locations

**Debug Logs:**
C:\ProgramData\IB-BIM\VisibilityManager\Logs
**File Location (Export / Import):**
There is no predefined output directory. When exporting or importing data, the user selects the desired folder through the standard file dialog. The tool does not enforce or assume any default export path
**Installation:**
C:\ProgramData\Autodesk\ApplicationPlugins\VisibilityManager.bundle\
### Excel File Format

**Column Reference:**

| Column | Description | Example |
|--------|-------------|---------|
| Filter_Name | Filter name | "Exterior Walls - Phase New" |
| Enable_Filter | Enabled in view | "Yes" or "No" |
| Visibility | Visible or hidden | "Yes" or "No" |
| Categories | Category names | "Walls; Doors; Windows" |
| Rules | Filter logic | "(Phase Created = New) AND (Type Name Contains 'Ext')" |
| Line_Color | Projection line color | "RGB(255,0,0)" or "No Override" |
| Line_Pattern | Projection line pattern | "Solid" or pattern name |
| Line_Weight | Projection line weight | "1" to "16" or "No Override" |
| Fill_Foreground_Color | Surface fill color | "RGB(200,200,200)" |
| Fill_Foreground_Pattern | Surface fill pattern | "Sand - Dense" |
| Fill_Background_Color | Background color | "RGB(255,255,255)" |
| Fill_Background_Pattern | Background pattern | "Solid" |
| Cut_Line_Color | Cut line color | "RGB(0,0,0)" |
| Cut_Line_Pattern | Cut line pattern | "Solid" |
| Cut_Line_Weight | Cut line weight | "3" |
| Cut_Fill_Foreground_Color | Cut fill color | "RGB(100,100,100)" |
| Cut_Fill_Foreground_Pattern | Cut fill pattern | "Diagonal Crosshatch" |
| Cut_Fill_Background_Color | Cut background color | "RGB(255,255,255)" |
| Cut_Fill_Background_Pattern | Cut background pattern | "Solid" |
| Transparency | Transparency % | "0" to "100" |
| Halftone | Halftone on/off | "Yes" or "No" |
| Custom_Parameters | Parameter definitions | See below |

**Custom_Parameters Format:**
ParamName:Type:Category:InstanceOrType|ParamName2:Type:Category:InstanceOrType
Example:
Wall_Finish:Text:Walls:Instance|Room_Dept:Text:Rooms:Instance Glossary BIM - Building Information Modeling Filter - Visibility rule that shows/hides elements based on conditions VG Overrides - Visibility/Graphics category-level overrides View Template - Reusable view settings including filters Custom Parameter - User-created parameter (not built into Revit) Pattern Library - Collection of fill pattern definitions (.PAT file) Conflict Resolution - How to handle items with same names (Merge/Overwrite/New Only) Current View - The active view when tool is launched (Panel ❶ reference) Target Views - Views where changes will be applied (Panel ❷) Target Templates - Templates where changes will be applied (Panel ❸) Rule Logic - The conditions in a filter (AND/OR statements) Category - Revit element type (Walls, Doors, Windows, etc.) Instance Parameter - Stored on each element individually Type Parameter - Stored on element type (shared by all instances)
End of User Guide Questions? Email: itzikb.bim@gmail.com Last Updated: November 2025 Version: 1.0.0RetryIB